Drawing III - Stages of a Drawing
- Eva Folks

- May 20, 2021
- 7 min read
Welcome back to the 3T Art Blog!
So, you have a great idea for a drawing and you’ve taken the time to set up a fab still life. The components are all in place. It looks just like you imagined it would. Now, where do you start the drawing?
In this post, the 3T Art Blog is going to help you answer that question. We’re going to have a look at where to start your drawing, how to measure accurate proportions and how to create relationships between the objects in your drawing.
Our Still Life
Here’s a pic of the still life we set up last week. After a few lighting set ups, we ended up selecting this one because of the strong dark, mid-tone and light values. It has a lot of information to guide you in your shading which is what will turn your line drawn shapes into objects with form. It’s what you need no matter what you’re drawing. Without information, we need to guess at how to create the forms of objects and those guesses aren’t always successful.

If you’d like to draw along, send an email to EvaFolksArt@gmail.com with STILL LIFE in the subject line and I'll email the image we're using over to you.
Getting Started
Pencils:
First, we’ll need supplies. I’d suggest using a range of drawing pencils (2H, HB, 2B, 3B graphite, 6B and 8B), two erasers and a few stumps. Check out the blog post Drawing I – What's Inside Your Drawing Toolbox .

Paper:
Since this drawing is going to be a study, I’d suggest using a sketching paper. I’ll be using a 14x17" sheet of Canson 65 lb Recycled Sketch paper. You can go larger, but I don't recommend smaller. It's always easier to work large than small. If this were a drawing I wanted to hang on to when it was done, I’d use a paper that was a bit heavier.

Source: Amazon
Drawing Board:
We’ll also need some kind of drawing board. You can use just about anything as long as it’s smooth, flat and clean. Don’t use anything flimsy like the cardboard backing on a sketch pad. I’d suggest a 16x20” piece of 1/8” or 1/4" thick Masonite. You can buy them at any art store.
Some are available with built in clips for your paper, which are great when you’re drawing on a pad of newsprint for a model drawing session. For what we’re doing, I’d suggest taping your paper to the drawing board using masking tape instead of clipping it. You’ll want to work with your paper as close to the centre of the board as possible.

Source: gistgear.com
I’m using a 16x20" - 1/2" wood veneered plywood drawing board with taped edges. It’s my favourite board to use anytime. I like it because it’s not too big or heavy and, because it’s made of plywood, chances are good it won’t warp or bend like a real piece of wood can from environmental factors.
Set Up:
For this study, I’ve decided to draw our still life set up using my tablet. This will make illustrating the stages we need to follow to create an accurately proportioned drawing much easier. I’ve set up my tablet (plugged in and set to never turn off) beside my easel at about the same height as the paper taped to my drawing board. This will make it easy to compare my drawing with the image of the still life. I also only need to turn my head slightly to see one or the other.

Creating an Accurately Proportioned Drawing
The key to learning to draw is all about proportions. You may have heard the term “just eye-ball it”. That's ok sometimes but it won’t help you create an accurate drawing. What you need to learn is how to see the proportions and angles in your drawing and make them work to your advantage.
I’m sure you’ve seen this before:

Here’s an artist holding up his pencil, a thumb will do too, and taking a vertical and horizontal measurement while squinting one eye. This is serving a purpose. It’s called sighting. He’s measuring the proportions of the objects he intends to draw. This is what we’re going to be doing too. This process does take practice, but once you understand it, the accuracy and overall results of your drawings will surprise you.
Stages of a Drawing
Drawing Area:
Start by locating your drawing area on the paper. How wide x high is your still life set up? This is good to measure out first so your drawing will be placed where you want it to be on the paper.
Use only very light construction lines and a 2H pencil when making marks on your paper.
First, measure the overall height of your still life set up using your pencil as a measuring stick and your thumb.
Hold your pencil in your drawing hand. With your arm straight out in front of you and pencil vertical, place the tip of your pencil at the top of the creamer and move your thumb down to the bottom of the single sugar cube. This will give you the measure of the overall height of your drawing. Hold that position.

Next, determine the proportion of your width in relation to the height. With your arm still stretched out, turn your hand so your pencil is horizontal. Don’t move your thumb. You need to keep the measure from the tip of your pencil to your thumb. Now, place the tip of your pencil on the left side of the sugar bowl (if you’re left handed it’ll be your thumb) and see how many times the height fits into the width.

Tip: Always start with the shorter proportion instead of the longest. In this case, the height is narrower than the width. If you had a very tall, narrow still life set up, you’d want to measure the width first and see how many times it fits into the height.
Here’s an example from real life that you’ll find interesting. Do you know how many times an average human head fits proportionally into the length of the average human body? Exactly 8 times!

Source: Quora
Back to our study. At this early stage, you can decide if the location of the drawing on the paper will be what you want. Now is the time to make move it. Left, right, up or down.

This is the placement of the objects only on your paper and it’s being done to set up your overall proportion. Make sure you add a bit of extra room on the left side of your drawing for your shadows.
If it all looks good, move on to the next stage, blocking in Key Measurements.
Key Measurements:
Once you have your drawing area established, you’ll need to start looking for key measurements between your objects using the same process we used to determine where your drawing will be located on the paper. Think big. At this stage, look at only the proportions between your largest objects.
Select one of your large objects to use as a base point to measure the proportions of other large objects in your still life. The height and width of our sugar bowl looks to be the best fit.
Continue drawing very light construction lines with a 2H pencil.

This begins the process of establishing relationships between the object.
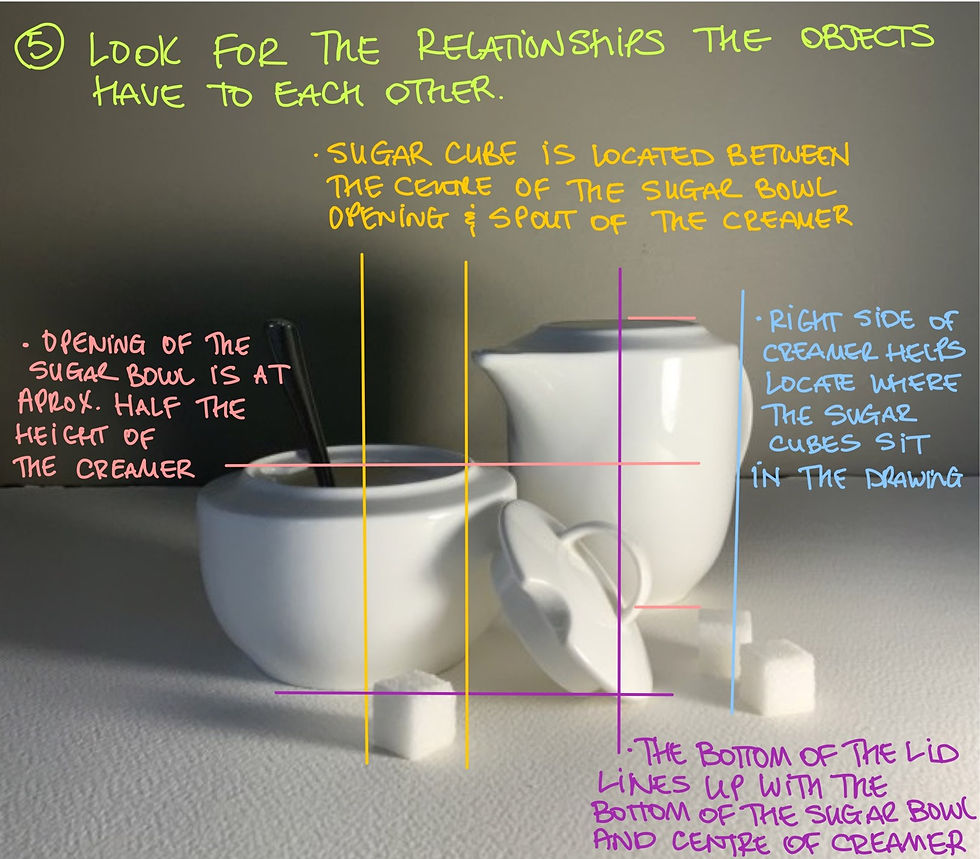
Object Relationships:
At this stage, determine where your smaller objects are located in relation to the larger objects on the paper. The more time you spend measuring proportions and angles, the easier it will be to connect the dots when you begin to draw in the shapes of the objects.
Always start with large shapes and break them down into smaller shapes as you go. This will help keep your drawing accurate as will double-checking your measurements from time to time as you draw.

Negative Shapes:
Negative shapes offer you a second way to check the accuracy of your drawing. It’s easy to miss an inaccurate angle or a line that’s too long or too short when you’re only focused on the objects you see. By looking at the negative shapes your still life objects create, you can ignore the objects themselves and look at the shapes that are created between them.

Make adjustments as necessary.
Line Drawing:
Here is the line drawing that I’ve ended up with following the above stages. I’m still going to need a few tweaks here and there, but for the most part, the objects are located and in proportion to the still life. That’s what I was aiming for in this study.

Looking at my drawing, you may be thinking that something just isn’t right. Something’s missing? You’d be correct. The shadows haven't been roughed in yet.
I was reminded earlier today that shadows are shapes too. They must be included in your line drawing, both on the objects and around them.

These will be our guides when we begin the process of shading. The way you add your dark, mid-tone and light values to the drawing will be what breathes life into the objects by giving them form.
Final Thoughts
These are the stages you can follow to create accurate drawings. It's a bit of work at the start, measuring for proportions and angles, but time spent setting up your construction lines will save you from a finished drawing that’s out of whack. Keep in mind, this process can be followed when you’re creating a painting too.
If you’re following along and drawing this still life, share your results with us on the
3T Art Blog Facebook page.
Next week we’ll look at how to add shading, highlights and a bit of colour to your drawing.
Until then, happy creating!
Eva
Enjoying the 3T Art Blog? Give this post a ❤ Like before you go.
If you’d like the 3T Art blog delivered right to your inbox every Thursday evening, just go to evafolksart.com and sign up.
If you’d like to leave a comment, you need to be a member of the site. Please join us! There will be benefits to being a member of the site. Perks and special offers will be coming your way soon!


Comments